Hardwood floors have long been a symbol of durability, beauty, and value in residential and commercial spaces. Whether you are renovating an old home or building a new one, understanding hardwood floor installation is essential for achieving a professional and long-lasting result. Among the many wood flooring options available, pine remains a popular choice due to its affordability, natural charm, and ease of working with. Learning how to install pine flooring correctly can help homeowners save money while still achieving a warm, rustic aesthetic.
This article provides a comprehensive guide to hardwood floor installation and explains step-by-step how to install pine flooring in a way that ensures durability, stability, and visual appeal.
Understanding Hardwood Floor Installation
Hardwood floor installation is the process of laying solid or engineered wood planks over a prepared subfloor to create a smooth and durable walking surface. The installation method can vary depending on the type of wood, the subfloor material, and the environment where it is being installed. Common installation methods include nail-down, glue-down, and floating floors.
Before beginning hardwood floor installation, proper preparation is crucial. The subfloor must be clean, dry, and level. Any moisture issues should be addressed beforehand, as wood flooring is highly sensitive to humidity changes. Acclimating the wood planks to the room’s temperature and humidity for several days is also necessary to prevent expansion or contraction after installation.
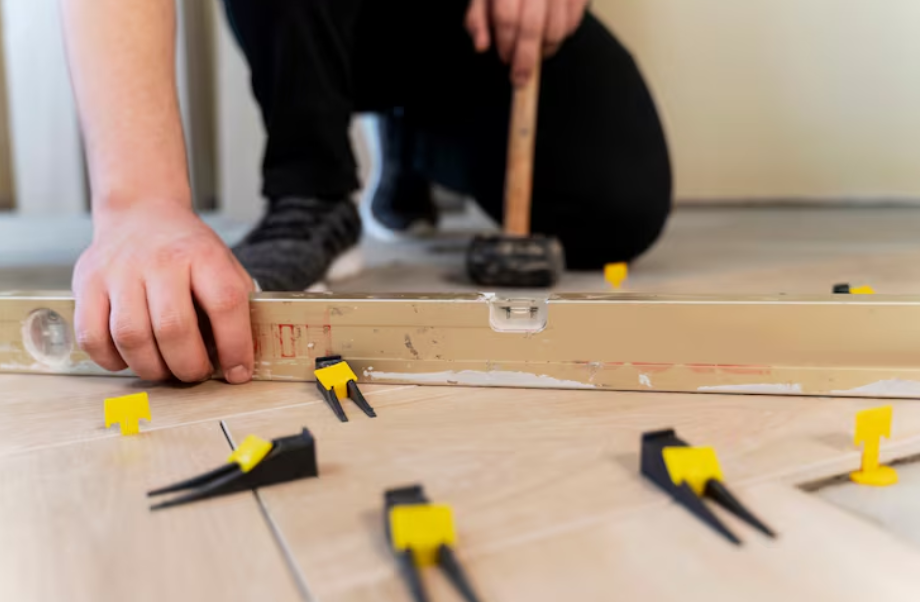
Another important aspect of hardwood floor installation is choosing the right tools. These typically include a flooring nailer, saw, spacers, measuring tape, chalk line, and safety equipment. Precision is key, as even small mistakes can affect the final appearance of the floor.
Planning the layout is also essential. Most installers start along the longest, straightest wall and work across the room. This ensures a balanced and visually appealing finish. During hardwood floor installation, expansion gaps must be left around the edges of the room to allow the wood to expand naturally over time.
Benefits of Hardwood Floor Installation
One of the main reasons homeowners invest in hardwood floor installation is durability. Hardwood floors can last for decades when properly maintained. They are also easy to clean, improve indoor air quality by reducing dust and allergens, and increase property value.
Another benefit is aesthetic appeal. Hardwood floors bring warmth and elegance to any space, making them suitable for both modern and traditional interiors. Additionally, they can be refinished multiple times, allowing homeowners to restore their original beauty without replacing the entire floor.
Choosing the Right Wood: Focus on Pine Flooring
While oak, maple, and walnut are common hardwood choices, pine flooring is often selected for its rustic character and affordability. Pine is technically a softwood, but it is widely used in flooring due to its unique grain patterns and warm color tones.
Understanding how to install pine flooring properly is important because pine is softer than other hardwoods and requires careful handling during installation. It is more prone to dents and scratches, so correct installation techniques can significantly improve its lifespan.
How to Install Pine Flooring Step-by-Step
Learning how to install pine flooring begins with preparation, just like any hardwood floor installation. The subfloor must be clean, dry, and structurally sound. Any uneven areas should be sanded or leveled before proceeding.
Next, the pine planks should be acclimated to the room for at least 48 to 72 hours. This step is critical because pine reacts quickly to changes in humidity. Skipping this step can lead to gaps or buckling after installation.
Once acclimated, begin laying out the boards. When learning how to install pine flooring, it is important to stagger the joints of the planks to create a natural and stable pattern. This not only improves the appearance but also enhances structural integrity.
Most pine flooring is installed using the nail-down method. A flooring nailer is used to secure each plank into the subfloor at an angle through the tongue of the board. This ensures that the nails remain hidden and the surface remains smooth. Spacers should be used along the walls to maintain the required expansion gap.
As you continue the process of how to install pine flooring, it is important to check alignment regularly. Even small shifts can become noticeable over time. Using a chalk line helps maintain straight rows throughout the installation process.
After all planks are installed, the floor should be sanded to create a smooth, even surface. This step is especially important for pine flooring, as it helps reduce the appearance of imperfections and prepares the surface for finishing.
Finally, a protective finish such as polyurethane, oil, or wax is applied. This not only enhances the natural beauty of the wood but also protects it from wear and tear.
Common Mistakes in Hardwood Floor Installation
Even experienced installers can make mistakes during hardwood floor installation. One common error is failing to properly acclimate the wood. This can lead to expansion or contraction after installation.
Another mistake is not leaving enough expansion space around the edges of the room. Without this gap, the flooring may buckle over time.
Using incorrect nails or improper fastening techniques can also compromise the stability of the floor. Precision and patience are essential throughout the entire hardwood floor installation process.
Mistakes to Avoid When Learning How to Install Pine Flooring
When learning how to install pine flooring, one of the biggest mistakes is rushing the process. Pine is softer and requires more careful handling than other hardwoods.
Another common issue is skipping the sanding or finishing steps. Without proper finishing, pine flooring is more susceptible to scratches, stains, and moisture damage.
Improper spacing between boards can also lead to long-term problems. Pine expands and contracts with humidity, so allowing proper spacing is essential for durability.
Maintenance Tips for Hardwood and Pine Flooring
After completing hardwood floor installation or learning how to install pine flooring, proper maintenance is key to preserving the floor’s appearance and longevity.
Regular sweeping and dry mopping help prevent dirt buildup that can scratch the surface. Avoid excessive moisture when cleaning, as water can damage wood flooring over time.
Using furniture pads under heavy objects helps prevent dents, especially on softer pine flooring. Rugs in high-traffic areas can also extend the life of the floor.
Periodic refinishing may be necessary depending on wear and tear. Hardwood floors can be sanded and refinished multiple times, while pine flooring may require more frequent touch-ups due to its softer nature.
Conclusion
Both hardwood floor installation and learning how to install pine flooring require careful planning, proper tools, and attention to detail. While hardwood offers unmatched durability and elegance, pine flooring provides a warm, rustic charm at a more affordable cost.
By understanding the correct techniques, avoiding common mistakes, and following proper installation steps, homeowners can achieve beautiful and long-lasting results. Whether you choose traditional hardwood or rustic pine, proper installation ensures your flooring remains a valuable and attractive feature of your home for years to come.

Leave a Comment