Photoshopping yourself into a picture used to mean spending an afternoon with the lasso tool and hoping no one noticed the halo around your hair. In 2026 it means something different. You have AI that can cut you out in one click, match the sunset on your face, and even paint a believable shadow under your shoes. You also have the same old physics of light that will betray you if you ignore it.
Why This Skill Still Matters When AI Can Do It For You
The temptation is to type “put me on a beach in Santorini” and let Generative Fill handle it. That works for a meme. It fails for anything you want people to believe.
Real compositing subjects because you need control over three matters AI guesses at:
Perspective. AI will scale you to match the body, not to suit the architecture. A doorway is ready eighty inches tall. If you are sixty eight inches tall in actual existence, you should be approximately 85 percentage of that doorway in the photo. Get it wrong and you look like a vacationer toy.
Light path and great. A background shot at 5 pm in iciness has lengthy, tender, heat shadows that fall to digicam left. Your selfie taken underneath a lavatory LED has brief, cool, pinnacle-down shadows. AI coloration matching can shift hue, it can not rebuild the form of light to your cheekbones.
Story consistency. If you are inserting your self into a own family reunion from 2018, the grain, the lens distortion, the moderate magenta forged of that vintage Canon, all of it needs to healthy. Otherwise your brain flags it right away.
This isn’t just a social media trick. The identical protecting, shade harmonizing, and shadow constructing is what commercial studios use daily to sell merchandise, degree homes, and create campaigns. Learning to location yourself convincingly teaches you the middle of professional retouching.
The Mindset Shift: Stop Cutting, Start Integrating
Beginners think the process is to cut themselves out cleanly. Pros suppose the job is to make two different snap shots overlook they have been ever separate.
That way you figure backwards. You do now not begin together with your selfie. You begin with the heritage and you ask:
- Where is the solar or most important mild
- How hard or gentle are the shadows
- What colour is bouncing off the floor into the shadows
- How an awful lot haze or intensity is within the air
- What does the digital camera do to directly lines at the rims
Only then do you shoot or choose your portrait. When you reverse the order, composites stop looking pasted.
Shoot Yourself Like You Plan to Lie
You will keep two hours in Photoshop with mins of making plans.
Match the attitude first. Open the heritage on your cellphone. Hold your cellphone on the same top as the authentic digital camera. If the heritage seems slightly up at buildings, crouch. If it seems down on a desk, stand on a stool. Horizon line is your cheat code. Put your eyes on the same horizontal aircraft because the subjects already inside the scene.
Match the light exceptional 2d. Hard solar makes a crisp nose shadow with defined edges. Overcast makes a soft gradient with out a side. Golden hour wraps warm light round one side of the face. Turn your body until the shadow underneath your nose points the equal path as shadows in the historical past. Use a window, a reasonably-priced LED panel, or simply step outdoor on the proper time.
Shoot larger and purifier than you need. Use your rear camera, not the selfie camera. Shoot RAW in case your telephone lets in it. Stand three ft from a plain wall, no longer in a cluttered room. Leave space under your ft and above your head. You can always crop tighter, you cannot invent missing footwear.
Take a reference shot of your hand or a grey card within the same mild. That gives you a impartial white balance target later when you are attempting to decide in case your pores and skin is just too crimson.
The Tools You Actually Need in Photoshop 2026
You do now not need to memorize each panel. Photoshop 2025 and 2026 consolidated the compositing workflow into a handful of dependable equipment.
Select Subject and Remove Background within the Properties panel now use the identical version that powers Generative Fill. For maximum portraits it receives hair eighty percent proper in a single click.
Select and Mask continues to be in which you earn your money. The Refine Hair brush, the Object Aware Refine mode, and the ability to paint your personal part detection make the difference between crunchy hair and actual hair.
Generative Fill and Generative Expand permit you to rebuild the background in the back of you. If your selfie is cropped at the waist but you want complete body, you may expand the ground and walls and then place yourself deeper within the scene.
The Harmonize Neural Filter is the short colour in shape. It reads the historical past and applies a lighting fixtures switch in your layer. It is extraordinary as a place to begin, mainly for pores and skin tones below mixed light.
Camera Raw Filter is your manual control room. You can regulate temperature one after the other for shadows and highlights, you may healthy texture and clarity, and you could add grain that fits the history ISO.
Curves with Blend If, Multiply and Soft Light blending modes, and Perspective Warp are the old-college equipment that also create the contact shadows, mild wrap, and floor aircraft alignment that AI skips.
Work non-destructively. Convert your portrait to a Smart Object before you remodel. Clip changes on your layer. Name layers Shadows, Midtones, Highlights. You will thank your self while the customer asks for a model at sunset instead of midday.
The Full Manual Workflow: How to Do It Right Once
Do this model as a minimum 3 times. After that the AI shortcuts will make sense due to the fact you’ll recognize what they’re approximating.
Step 1: Analyze the heritage. Place publications on the horizon. Look for verticals that converge. Note the route and length of current shadows. Sample a highlight, a midtone, and a shadow with the eyedropper. Write down the RGB values. This is your target palette.
Step 2: Place your portrait as a Smart Object. Lower opacity to 50 percentage. Scale so your eye degree sits at the identical horizon as others in the scene. Do no longer worry about colour yet.
Step 3: Rough masks. Select Subject, then Select and Mask. Output to Layer Mask. Zoom to two hundred percentage. Paint black at the masks with a smooth brush at 30 percentage go with the flow round hair. Switch to a tough brush for shoulders and garments. Turn on Decontaminate Colors at 10 percent for fringe.
Step four: Perspective healthy. Edit > Perspective Warp. Draw a box around your torso and legs. Pull corners until your toes sit down flat at the ground plane. If the background changed into shot at 24mm, add a tiny little bit of Filter > Lens Correction > Custom > Geometric Distortion to fit barrel warp.
Step five: Block in light direction. Create a Curves layer clipped to you. Pull the curve up barely. Invert the masks to black, then paint white on the side of your face that need to seize the important thing light. Duplicate the Curves layer, pull down for the shadow side. You are sculpting mild to in shape the scene before you contact color.
Step 6: Color match in zones. This is the technique PHLEARN teaches for photorealism. Duplicate your concern three times. Name them Shadows, Midtones, Highlights. On each, add Camera Raw Filter. In the Masking panel, use Luminance Range to restriction the edit to simply that tonal region. Now heat the highlights to suit sundown, cool the shadows to in shape sky leap, and go away midtones neutral. This beats a unmarried coloration balance whenever.
Step 7: Edge integration. Real topics are not perfectly sharp against historical past. Add a tiny bit of blur in your masks area wherein intensity of subject would soften. Use Filter > Blur > Gaussian Blur at the mask itself at zero.5 to 1 pixel.
Step 8: Contact shadow. New layer under you. Soft black brush at 20 percentage, paint a good form in which shoes meet ground. Blur at 6 to twelve pixels depending on mild hardness. Lower opacity to 40 to 70 percent. For tough solar, make a 2nd sharper shadow layer offset inside the route of historical past shadows.
Step nine: Cast shadow. Duplicate your difficulty, fill with black, distort with Cmd+T > Distort to put it on the floor plane. Blur closely, decrease opacity to fifteen to twenty-five percentage. Mask away wherein items might block it.
Step 10: Light wrap and ambient bounce. Cmd-click your masks, Select > Modify > Expand three px, Feather five px. New layer set to Soft Light above you. Sample a coloration from the intense sky or wall nearest you. Paint lightly on the threshold dealing with that source. This simulates light spilling around you.
Step 11: Match grain and sharpness. Stamp visible. Filter > Camera Raw > Effects. Add Grain amount 10 to twenty-five to suit history noise. If heritage is soft, upload moderate blur for your layer with Field Blur at 2 to four pixels. If heritage is crunchy telephone element, upload Clarity +10 in your situation.
Step 12: Global glue. Add a very last Curves or Color Lookup adjustment over everything. Slightly carry blacks, pull down whites, or upload a film emulation at 10 percent opacity. When each layers get hold of the same final grade, the brain accepts them as one seize.
Step thirteen: Check at three scales. At a hundred percentage take a look at hair edges. At 50 percent take a look at shade. At suit-to-screen test scale and shadow route. Flip canvas horizontal to identify mistakes your eye normalized.
This process is what superior compositing publications nevertheless train as it forces you to look light as volumes, now not as sliders.
The AI-First Workflow: Five Minutes to Believable
Once you understand the guide steps, you could allow Photoshop do the heavy lifting.
- Open history. Drag in selfie. In Properties, click on Remove Background.
- Scale and area. Right click > Convert to Smart Object.
- Filter > Neural Filters > Harmonize. Choose the historical past layer as reference. Adjust Strength to 70 to 85, now not one hundred. It will in shape lights and colour immediately.
- If your toes are reduce off, use the Crop tool with Generative Expand to feature ground under you. Make a free lasso wherein ground should be, Generative Fill with spark off “persevering with wood ground in attitude”.
- Add the contact shadow manually. AI shadows nevertheless waft in 2026. A smooth brush takes 20 seconds and sells the photo.
- Stamp seen, Camera Raw Filter, upload grain to unify.
This hybrid approach is exactly what Adobe and PHLEARN now endorse, integrate AI for pace and guide for manage.
Hair, Glasses, and Semi-Transparent Edges
Hair is in which composites die. Do not try to mask each strand. Mask the solid core, then rebuild the first-class edge.
After your preliminary Select and Mask, create a brand new layer above your problem, clip it, set to Screen or Lighten. Sample the historical past color at the back of the hair, take a small soft brush at 10 percentage, and paint stray hairs lower back in. You are portray mild, no longer covering.
For glasses, duplicate your situation, place the copy underneath the authentic, and use it to create reflections. Lower opacity, upload a moderate Gaussian Blur, masks to simply the lenses. Sample the history highlights and paint them faintly into the glass.
For motion blur or flyaway fabric, do no longer sharpen. Blur your concern slightly to in shape. Sharpness mismatch is greater apparent than moderate softness.
Putting Yourself Into Specific Types of Photos
Travel photographs. The giveaway is scale and haze. Distant mountains are desaturated and coffee evaluation because of atmosphere. Duplicate your difficulty, add a blue Photo Filter at 15 percent, decrease comparison with Curves. Place yourself barely smaller than you suspect.
Group photos wherein you had been lacking. Ask for 2 or 3 supply photos from the same event. You want matching noise and white balance. Align layers, masks yourself in, then use the institution photograph’s existing shadows as a template for your very own. Adobe’s personal academic on solving group snap shots uses this genuine layer alignment and protecting approach.
Historical or movie seems. Add grain first, then color. Use Camera Raw to add 35mm grain length 25, then use Split Toning to push shadows towards teal and highlights closer to heat. Match the halation by duplicating your layer, blurring 20 pixels, setting to Screen at 10 percentage.
Product or actual property style composites. This is wherein precision topics maximum because shoppers word crooked verticals. Use the Ruler tool to draw along a door body, then Image > Image Rotation > Arbitrary to straighten. Use Adaptive Wide Angle to correct lens distortion before setting your self. Real estate editors do that on each photo.
Common Reasons It Looks Fake and How to Fix Them
If your composite feels off, run this checklist.
- Feet floating. Zoom to 300 percentage. Is there a 1 to two pixel gap among shoe and shadow? Paint the contact shadow darker and tighter.
- Skin too saturated. Backgrounds shot in daytime are generally 10 to twenty percentage much less saturated than a cellphone selfie. Add a Hue/Saturation layer clipped to you, decrease Saturation to -15.
- Wrong black point. Sample the private shadow in historical past, observe RGB. Sample your hair shadow. If yours is 0,0,0 and theirs is 18,18,22, carry your blacks with Curves.
- Edge too crisp. Real lenses bloom. On your layer masks, practice Filter > Blur > Gaussian Blur 0.7 px.
- Light direction flipped. Flip your canvas. If it abruptly appears wrong, you painted light on the wrong side.
Ethics, Disclosure, and When Not to Do It
In 2026 audiences expect pix are edited, however they nevertheless care about motive. Putting your self right into a own family holiday you ignored is harmless fun. Putting yourself into a information occasion, a protest, or a actual estate listing to misrepresent attendance or condition crosses a line.
If you put up a composite publicly, bear in mind a diffused disclosure. Not due to the fact you need to, however due to the fact trust compounds. Creators who label AI composites get more range to play later.
For expert paintings, preserve your layered PSD. Clients will ask for revisions months later and you may want the masks.
When to DIY and When to Hand It to Specialists
You need to study this workflow as it teaches you to peer. You ought to not spend six hours putting off vacationers from 50 list photos if you have a deadline.
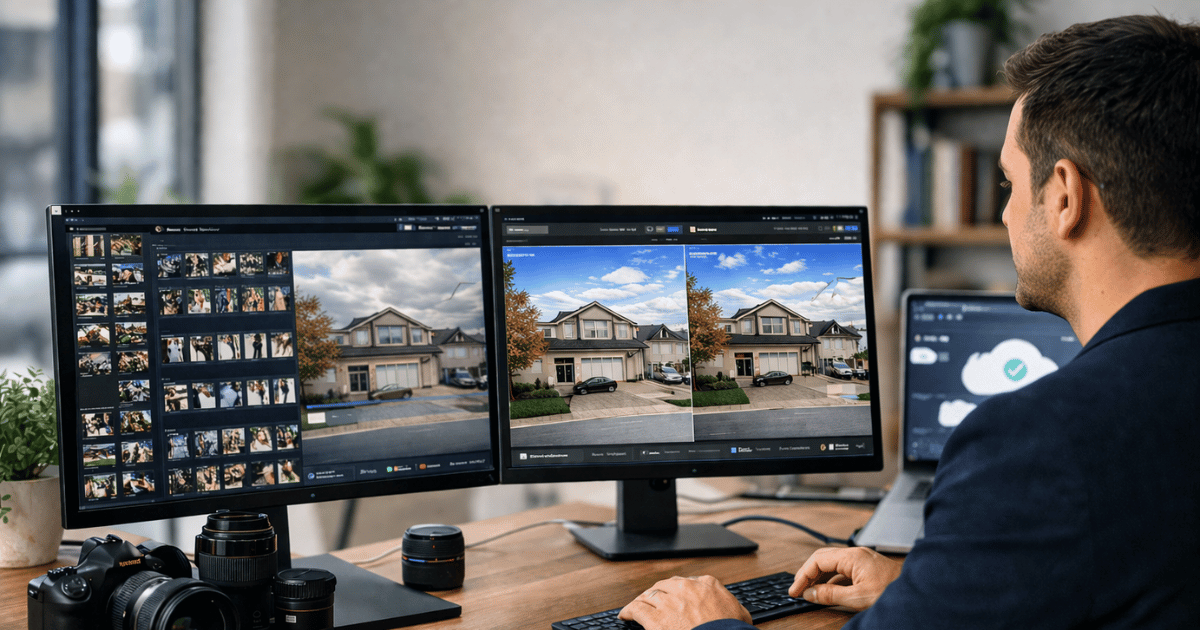
This is wherein reading industries that composite at scale helps. Real estate picture editing is largely compositing boot camp. Every day, editors take a flat noon outdoors and flip it right into a dusk hero shot, they take away automobiles and trash containers, they really stage empty rooms with furniture that matches attitude and mild, and that they blend multiple exposures into one herbal image.
Companies like PixelShouters have constructed complete groups round this specific talent set. They offer rapid, less expensive, and wonderful photo editing services for real property experts and make belongings images stand out with herbal and realistic upgrades. Their carrier listing reads like a compositing syllabus: HDR Real Estate Photo Editing, Object Removal, Day to Dusk or Twilight Editing, Aerial Photo Editing, Virtual Staging, Panorama Photo Stitching, Floor Plan Editing, Sky and Grass Replacement, and Virtual Renovation.
They serve extra than 10,000 customers globally due to the fact they clear up the same issues you are mastering, matching color temperature, rebuilding shadows, correcting attitude, and maintaining edges smooth. If you’re working towards on interiors otherwise you want a batch of pics to appearance consistent for a portfolio, outsourcing to a crew that does this day by day is frequently cheaper than some time. Watch how they take care of window pulls and twilight conversions, then steal the ones strategies in your very own self-insert tasks.
Your 30-Day Practice Plan
Week 1: Do three manual composites. One outside sunny, one indoor window light, one night scene. Focus handiest on shadows and perspective, ignore perfect hair.
Week 2: Repeat the equal three photos the usage of only Harmonize and Generative Fill. Compare. Note in which AI fails on shadows.
Week three: Choose a difficult area challenge. Glasses, curly hair, or a bicycle with spokes. Use Select and Mask with Object Aware Refine. Practice rebuilding edges with the light-portray technique.
Week four: Create a sequence. Put your self into 5 images from the equal ride with regular shade grading. Export as a carousel. This teaches batch consistency, that is the actual expert ability.
Save every PSD with layers intact. In six months you may open them and straight away see what you neglected. That is how you improve.
Final Export Checklist
Before you submit or send:
- View at a hundred percentage, 50 percentage, and thumbnail
- Flip horizontal
- Turn off your subject layer, does the history appearance untouched
- Turn off historical past, does your cutout appearance clean on black and on white
- Check document length and sharpening for the platform. Instagram desires extra output polishing than print
- Keep a master PSD, export a JPG at quality 10 to 12 with sRGB profile
Learning to Photoshop yourself right into a image isn’t always approximately tricking humans. It is about expertise how cameras see light, how our brains study depth, and how to admire each. The gear will preserve getting faster. Harmonize and Generative Fill gets better at guessing. Your eye for shadow path, for the mild blue in coloration, for the manner toes sincerely touch floor, that is what will keep your work plausible whilst everybody else settles for almost proper.


Sign up