


How to Install a Frontal Like a Pro for an Undetectable Finish
You’ve probably scrolled past those videos on your feed—the ones where a stylist pulls back a wig to reveal a hairline so seamless it’s almost impossible to tell where the skin ends and the lace...

You’ve probably scrolled past those videos on your feed—the ones where a stylist pulls back a wig to reveal a hairline so seamless it’s almost impossible to tell where the skin ends and the lace begins. That “melted” look has become the gold standard for wig wearers, and honestly, it’s understandable why. It’s the difference between a wig that looks like a wig and a look that feels like a natural part of you.
Top Content
But here is the reality: getting that finish isn’t just about having an expensive unit. It’s about the technique, the patience, and the way you prep your base. Achieving an undetectable install is a skill, and like any other skill, it takes some practice. If you are tired of visible lace and lifting edges, this breakdown will help you get closer to that professional-grade finish at home.
Getting the Right Base: Frontal vs. Closure
Before you start worrying about adhesives and melt bands, you have to make sure you are working with the right hardware. A lot of frustration comes from trying to use a unit that doesn’t quite fit the style you’re aiming for.
Most people start by choosing between a frontal and a lace front closure. A standard closure gives you a smaller section of lace—usually about 4 by 4 inches—which is great if you want a reliable middle or side part. It’s low maintenance and easy to throw on. However, if you are looking for that full, ear-to-ear hairline versatility, a frontal is the way to go. It spans 13 inches across, which gives you the freedom to pull your hair back, tuck it behind your ears, or style it in ways that would look unnatural with a smaller closure piece.
If you are someone who loves a high ponytail or a slicked-back updo, you might want to look into a 360 lace frontal wig. This design offers lace around the entire perimeter of your head, which provides a much more natural look when you pull your hair up in the back. Knowing which piece serves your specific style goal will save you a lot of headache before you even reach for the glue.
The Reality of the Installation Process
Applying a wig isn’t just slapping it on and hoping for the best. It’s a multi-step process that demands a clean canvas. If you’ve ever had your lace lift within an hour, it usually comes down to one of two things: the skin wasn’t prepped correctly, or the glue was applied too thickly.
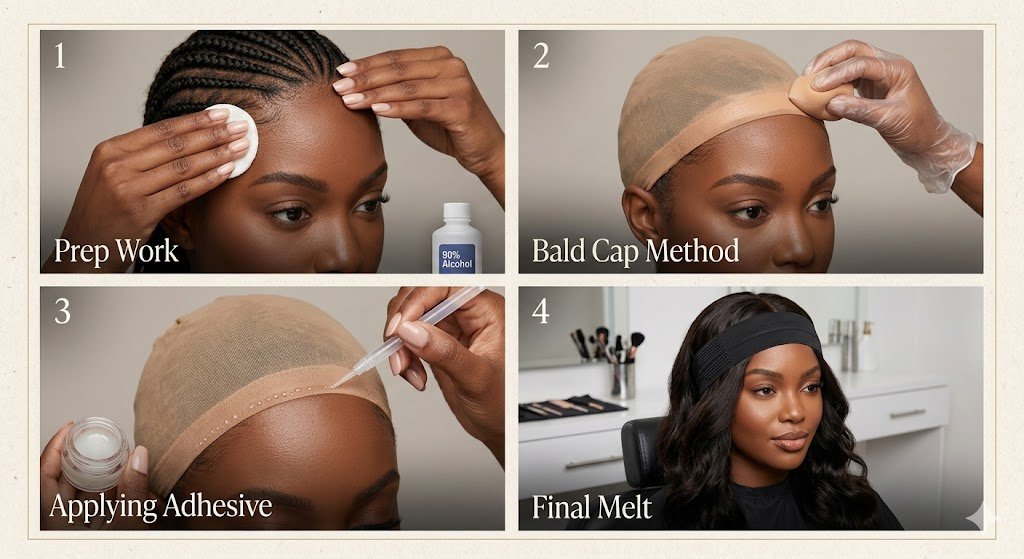
Step 1: Prep the Surface
Your scalp and hairline need to be completely free of oils, makeup, and sweat. If you skip this, no adhesive on earth is going to hold for long. Grab some rubbing alcohol on a cotton pad and swipe along your forehead until the skin is squeaky clean. This removes the barrier that prevents the glue from bonding.
Step 2: The “Fake Scalp” Technique
To get that invisible finish, you need to create an illusion. The bald cap method is widely used because it works. Place a wig cap that matches your skin tone over your head, making sure it sits right where your hairline is. Once it’s secure, apply a layer of spirit gum or lace adhesive to the edge, cut the excess cap, and dab a bit of foundation on top. When you lay your frontal hair over this, the lace sits against a surface that already matches your skin color, which makes the “melt” almost effortless.
Step 3: Layering the Adhesive
The biggest rookie mistake? Slapping on a huge glob of glue. Professional installs rely on thin, transparent layers. Use a small applicator to spread the glue into a very thin, even line. Wait for it to turn clear before you add another layer. Two or three thin, dry layers will hold significantly better than one thick, wet one.
The Melt: Why It Matters
Once you press the lace into the glue, the job isn’t done. You need to “melt” it. This is where a melt band comes in. By wrapping a firm, stretchy band around your hairline for at least 15 to 20 minutes, you are applying the pressure needed for the lace to actually fuse with the adhesive. This step is non-negotiable if you want that “skin-like” finish.
Pros, Cons, and Common Hurdles
It’s fair to ask: is the effort really worth it? Like everything else in beauty, there are tradeoffs.
- Versatility: The main pro is clear—you have total styling freedom. You can part your hair, braid it, or pull it back without the wig looking stiff or fake.
- Maintenance: The con is the time commitment. An install isn’t “toss and go.” It requires maintenance, cleaning, and eventual reapplication to keep your edges healthy and the look fresh.
- The “Fine Edge” Concern: If your edges are a bit fragile, you have to be extra careful. Using harsh glues or heavy-duty removers can cause damage. We often recommend a “glueless” install method for daily wear to give your hairline a break.
Frequently Asked Questions:
- How long should an install stay on? Usually, about one to two weeks is the sweet spot. If you keep it on longer, you risk build-up and scalp irritation.
- Can I sleep in it? You can, but you need to wrap it properly with a silk or satin scarf. Protecting the hair at night is just as important as the install itself.
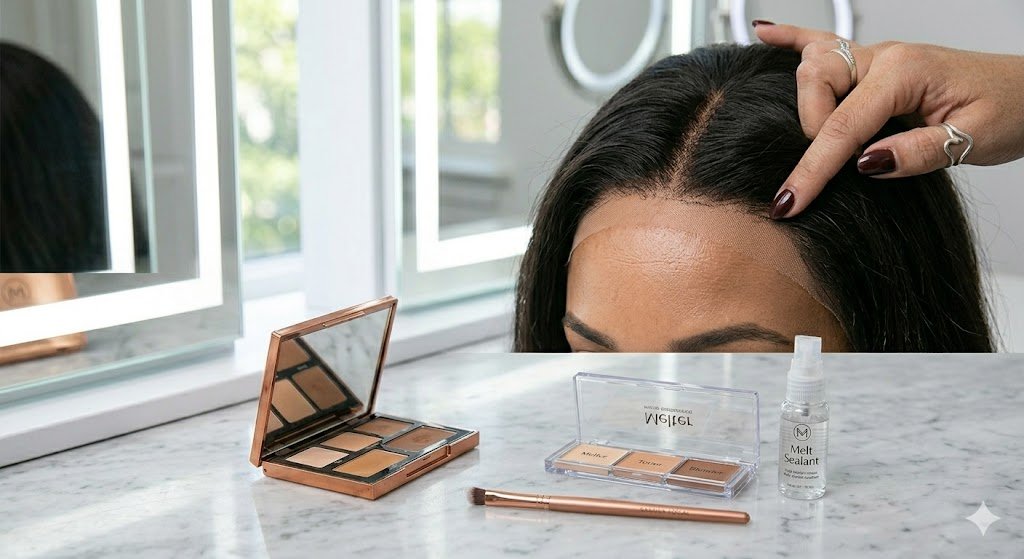
- What if the lace looks too light? Tinting your lace with a little bit of powder foundation that matches your skin tone can solve that problem instantly.
Elevating Your Routine
At the end of the day, your look is only as good as the hair you start with. If the quality of the hair is poor, even the best install will struggle to look natural. We are currently running our Semi-Annual Sale, and it’s the perfect time to grab an upgrade. You can take 30% off our entire collection, which includes our most popular frontal units. Whether you’ve been eyeing a deep wave, a silk straight look, or something in between, you can get high-end, durable hair for a fraction of the cost.
Final Thoughts
The “melted” look is less about magic and more about precision. It’s about taking those extra ten minutes to prep your skin, being patient with your adhesive, and finding the right wig construction for your lifestyle.
Don’t be discouraged if your first attempt feels a bit messy. It’s a learning process. Play around with how much you pluck the hairline, experiment with different foundations, and figure out what makes you feel the most confident. When you get it right, there’s no better feeling than looking in the mirror and seeing hair that looks exactly like it’s growing from your own scalp. Take your time, focus on the details, and enjoy the confidence that comes with a perfect install.